In my previous post, I talked about deploying a Big Data Cluster on a single node Kubernetes cluster. That’s cool and all but what if you’re a business or organization that cannot have your data on the cloud for whatever reason? Is there a way to deploy a Big Data Cluster on-premise? Absolutely! I’ll walk you through setting that up this blog post. I will walk you through deploying a 3-node Kubernetes cluster, then deploying a Big Data Cluster on top of that.
Assumptions
There are a few assumptions before we get started:
- You have at least 3 virtual machines running with the minimum hardware requirements
- All your virtual machines are running Ubuntu Server 16.04, or 18.04, and have OpenSSH installed
- All the virtual machines have static IPs and on the same subnet
- All the virtual machines are updated and have been rebooted (see below for the command):
Command to update and reboot the servers:
sudo apt update && sudo apt upgrade -y
sudo systemctl reboot
Prepare All Nodes
Now that the above is done, it’s time to start preparing all the nodes (master and worker nodes). I will refer to servers as nodes from this point forward.
Let’s start by connecting to all the nodes via SSH and run the below command on each node to add the node to the /etc/hosts file:
echo $(hostname -i) $(hostname) | sudo tee -a /etc/hosts
1. Disable swapping by running the below command on each of your nodes:
sudo sed -i "/ swap / s/^/#/" /etc/fstab
sudo swapoff -a
2. It’s time to import the keys and register the repository for Kubernetes by executing the below command on each of your nodes:
sudo curl -s https://packages.cloud.google.com/apt/doc/apt-key.gpg | sudo apt-key add -
echo 'deb http://apt.kubernetes.io/ kubernetes-xenial main' | sudo tee -a /etc/apt/sources.list.d/kubernetes.list
3. You will need to configure docker and Kubernetes prerequisites on the machine by running the below command on each of your nodes:
KUBE_DPKG_VERSION=1.17.0-00
sudo apt-get update && \
sudo apt-get install -y ebtables ethtool && \
sudo apt-get install -y docker.io && \
sudo apt-get install -y apt-transport-https && \
sudo apt-get install -y kubelet=$KUBE_DPKG_VERSION kubeadm=$KUBE_DPKG_VERSION kubectl=$KUBE_DPKG_VERSION && \
curl https://raw.githubusercontent.com/kubernetes/helm/master/scripts/get | bash
4. Set net.bridge.bridge-nf-call-iptables=1. (On Ubuntu 18.04, the following commands first enable br_netfilter).
. /etc/os-release
if [ "$VERSION_CODENAME" == "bionic" ]; then sudo modprobe br_netfilter; fi
sudo sysctl net.bridge.bridge-nf-call-iptables=1
You are now done getting all the nodes prepared. Now we will focus on the node that will become the master.
Configure the Kubernetes Master
1. Create an rbac.yaml file in your current directory with the following command:
cat <<EOF > rbac.yaml
apiVersion: rbac.authorization.k8s.io/v1
kind: ClusterRoleBinding
metadata:
name: default-rbac
subjects:
- kind: ServiceAccount
name: default
namespace: default
roleRef:
kind: ClusterRole
name: cluster-admin
apiGroup: rbac.authorization.k8s.io
EOF
2. It’s time to initialize the Kubernetes master on this node. The example script below specifies Kubernetes version 1.17.0. The version you use depends on your Kubernetes cluster:
KUBE_VERSION=1.17.0
sudo kubeadm init --pod-network-cidr=10.244.0.0/16 --kubernetes-version=$KUBE_VERSION
3. Note the kubeadm join command (the last two lines in the screenshot below. Your output will be unique). You will need this in upcoming steps when joining worker nodes to the cluster.
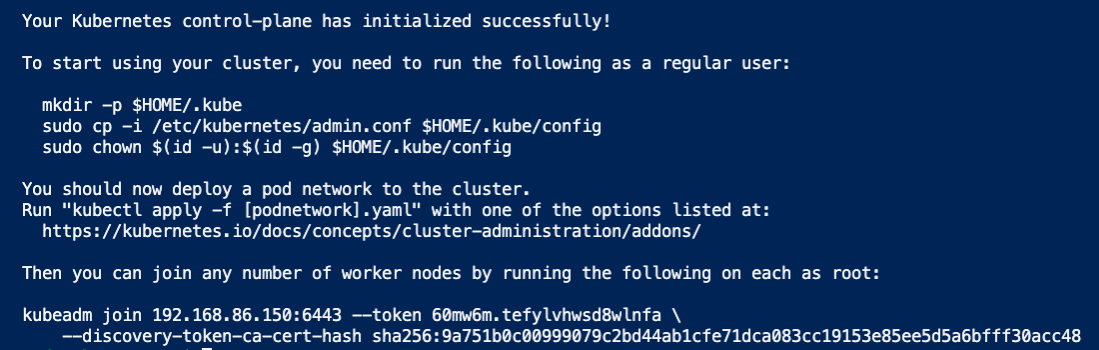
If for some reason you cannot find it, run the below command on the master node to print it out:
kubeadm token create --print-join-command
4. Set up a Kubernetes configuration file in your home directory by executing the below command on your master node:
mkdir -p $HOME/.kube
sudo cp -i /etc/kubernetes/admin.conf $HOME/.kube/config
sudo chown $(id -u):$(id -g) $HOME/.kube/config
5. Configure the cluster and the Kubernetes dashboard by running the below command on your master node:
kubectl apply -f https://raw.githubusercontent.com/coreos/flannel/master/Documentation/kube-flannel.yml
helm init
kubectl apply -f rbac.yaml
kubectl apply -f https://raw.githubusercontent.com/kubernetes/dashboard/v1.10.1/src/deploy/recommended/kubernetes-dashboard.yaml
kubectl create clusterrolebinding kubernetes-dashboard --clusterrole=cluster-admin --serviceaccount=kube-system:kubernetes-dashboard
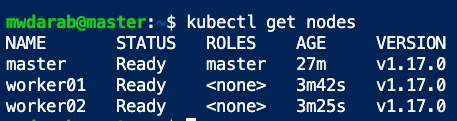
You can check the master status by running kubectl get nodes (as shown below):

You can find the status by running the kubectl get nodes command on the master node.
Configure the Worker Nodes
Now that the master node is configured and the status is ready, it’s time to join the worker nodes to the Kubernetes cluster and configure them.
1. Execute the kubeadm join command output on each of your worker nodes. Wait until you see the following output (and brought back to the prompt):

Now if you go back to the master node and execute the kubectl get nodes command, you will see all the nodes in the cluster (as shown in the screenshot below):
2. Run below command on each of the worker nodes to create local storage volumes:
wget setup-volumes-agent.sh https://raw.githubusercontent.com/microsoft/sql-server-samples/master/samples/features/sql-big-data-cluster/deployment/kubeadm/ubuntu/setup-volumes-agent.sh
3. Run the below command to grant the .sh file execution privilege:
chmod +x setup-volumes-agent.sh
4. Run the script by executing the below command:
sudo ./setup-volumes-agent.sh
This created 25 volumes in the /mnt/local-storage/ folder. (If you do an ls /mnt/local-storage/ you will see all the folders.)
Back to the Master
1. Download the following file on master node:
wget local-storage-provisioner.yaml https://raw.githubusercontent.com/microsoft/sql-server-samples/master/samples/features/sql-big-data-cluster/deployment/kubeadm/ubuntu/local-storage-provisioner.yaml
2. Run the below command on the master node to apply it:
kubectl apply -f local-storage-provisioner.yaml
3. It’s time to install azdata on the master node. First you need to get the packages needed for the installation by running the command below:
sudo apt-get update
sudo apt-get install gnupg ca-certificates curl wget software-properties-common apt-transport-https lsb-release -y
4. Download and install the signing key on the master node:
curl -sL https://packages.microsoft.com/keys/microsoft.asc |
gpg --dearmor |
sudo tee /etc/apt/trusted.gpg.d/microsoft.asc.gpg > /dev/null
5. Add the azdata repository information by running the below command against the master node:
Ubuntu 16.04, run:
sudo add-apt-repository "$(wget -qO- https://packages.microsoft.com/config/ubuntu/16.04/mssql-server-2019.list)"
Ubuntu 18.04, run:
sudo add-apt-repository "$(wget -qO- https://packages.microsoft.com/config/ubuntu/18.04/mssql-server-2019.list)"
6. Update repository information and install azdata by running the below commands against the master node:
sudo apt-get update
sudo apt-get install -y azdata-cli
7. Verify the azdata install by running the below command against the master node :
azdata --version
You should see the latest version of azdata printed out. To get the latest about azdata go here.
Deploy the Big Data Cluster
We are almost across the finish line, trust me! Now that we have the Kubernetes cluster working and all the worker nodes joined, it’s time to kick off the Big Data Cluster deployment.
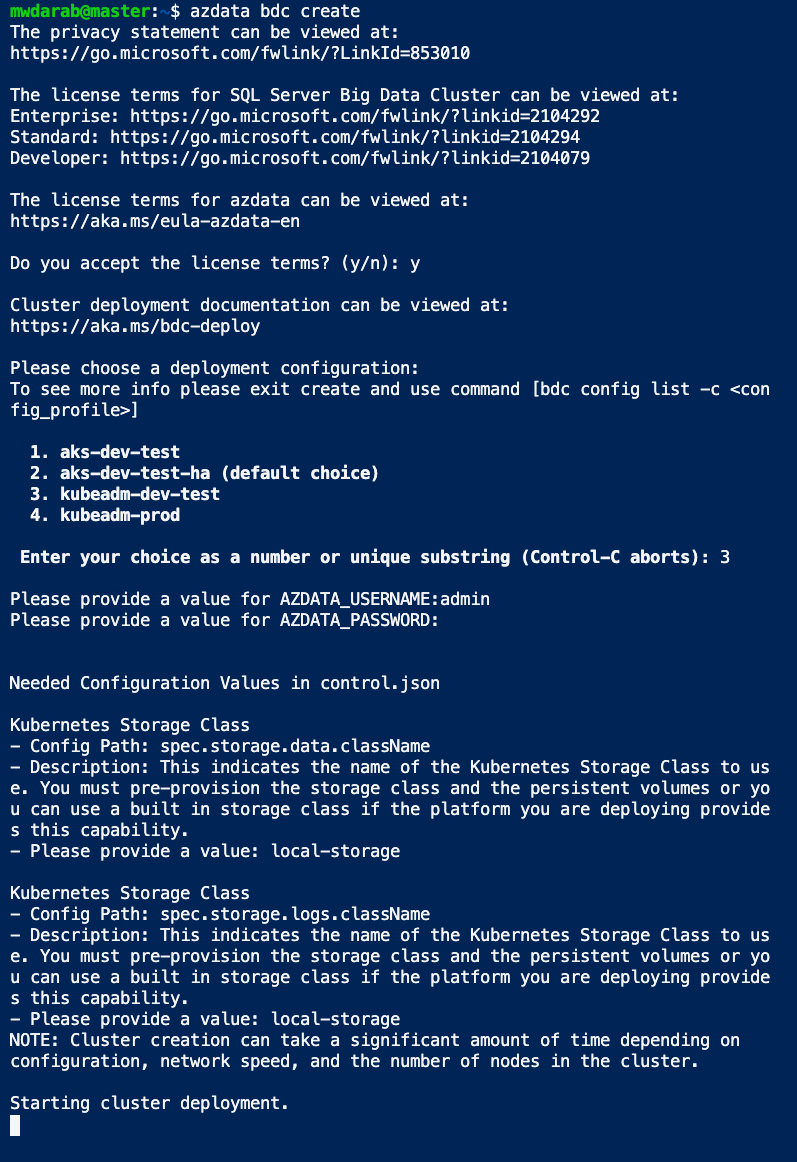
1. SSH onto the master node and execute the below azdata command:
azdata bdc create
2. Accept the terms by pressing y then pressing return.
3. For the deployment type, choose option 3 (“kubeadm-dev-test”) and press return.
4. Type azdata username/password (choose whatever you want)
5. Type “local-storage” for the kubernetes storage class prompts (twice).
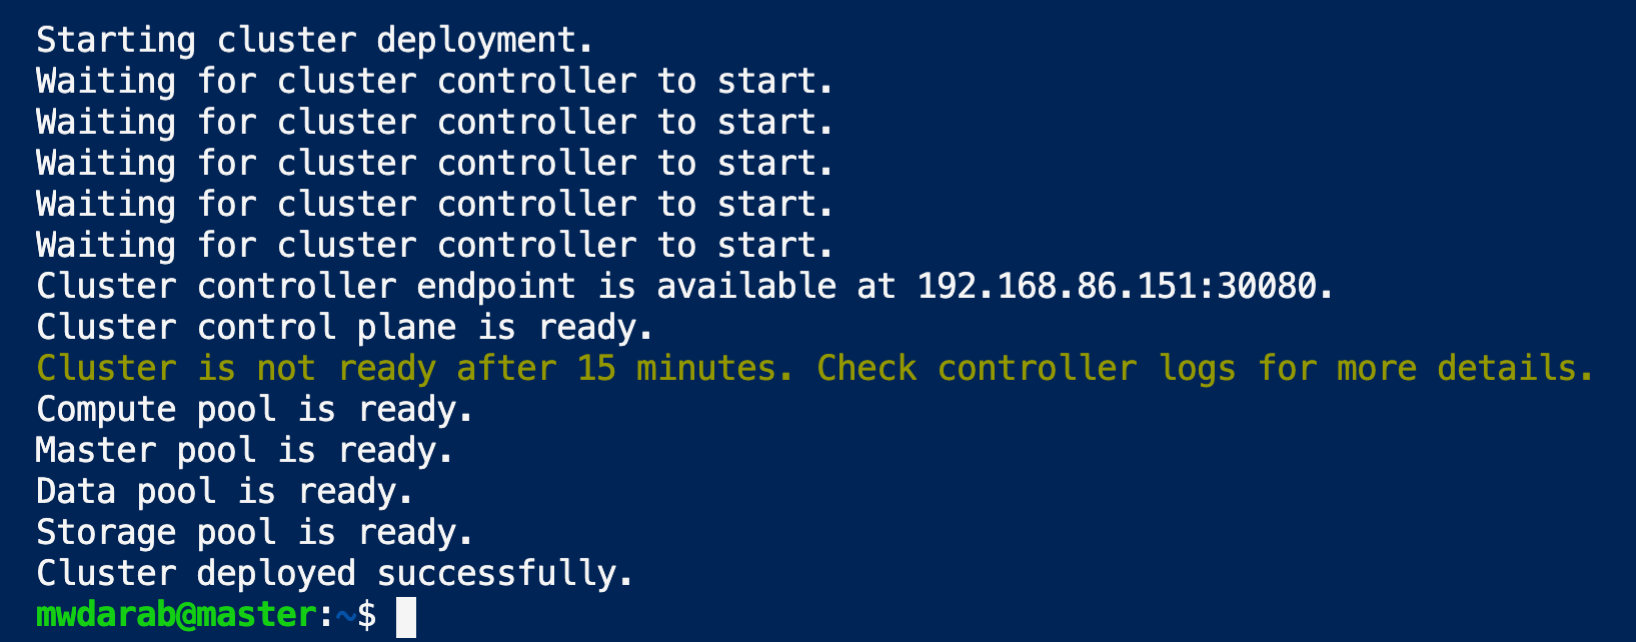
You should see the “Starting cluster deployment” as show in the screenshot below:
After 20-30 minutes you should see a print out similar to the below screenshot:
Finally, run the below command to get a list of all the endpoints (see screenshot below):
azdata bdc endpoint list -o table
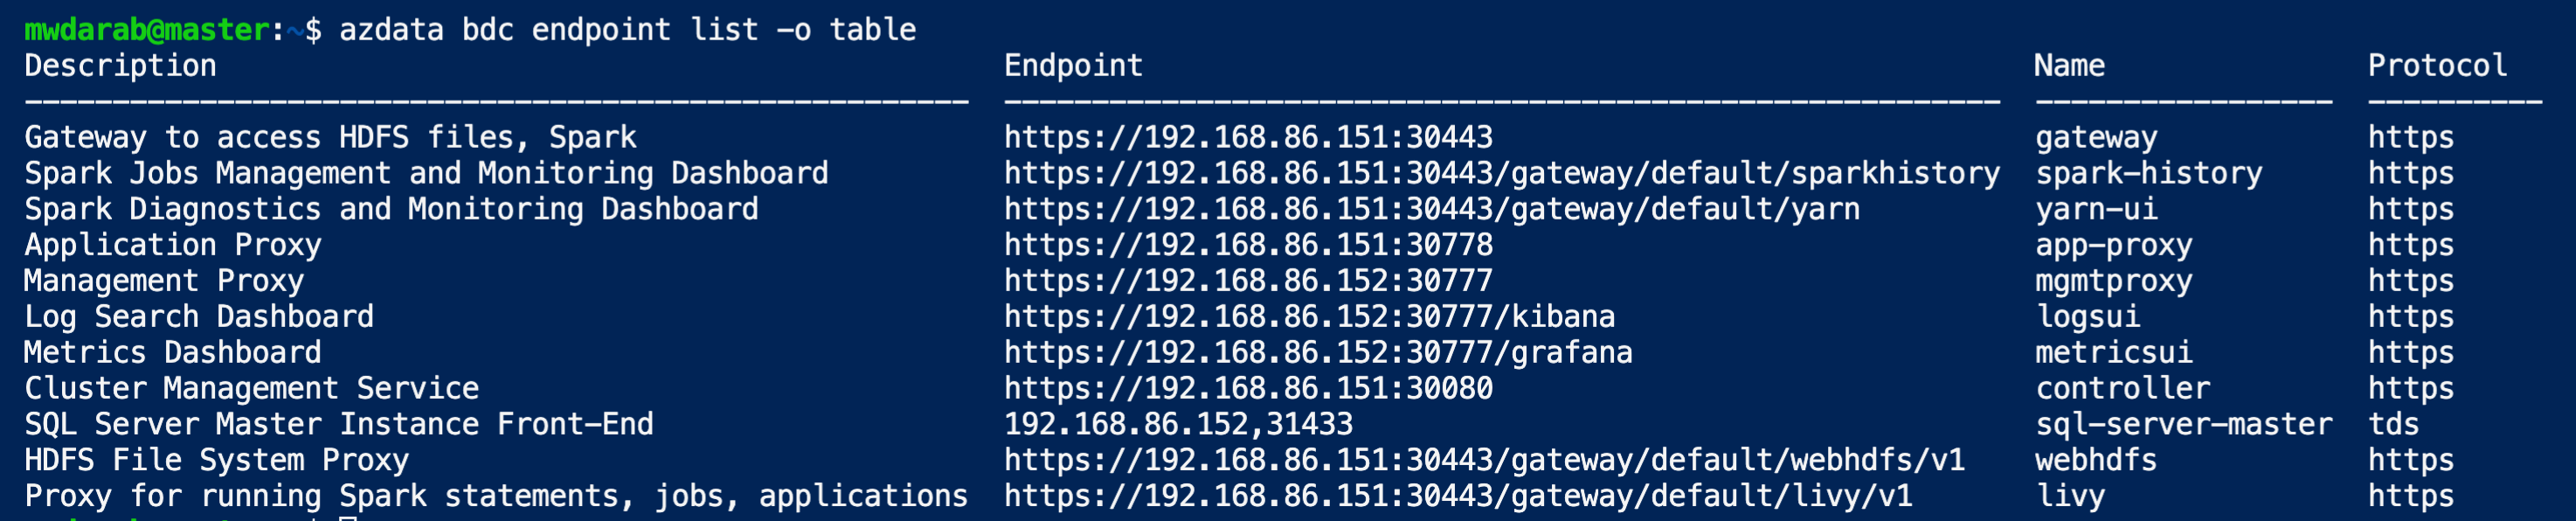
Now you can use the SQL Server Master Instance Front-End endpoint to connect via Azure Data Studio or SSMS. If you have any questions or encounter any issues, feel free to contact me so I can help you out.
Additional Resources
If you are eager to learn more about Kubernetes I highly recommend Anthony Nocentino’s courses on Pluralsight. You can view his Pluralsight author page here. What? You don’t have a Pluralsight subscription? No problem! You can also reach out to him on Twitter @nocentino for a FREE 30-day trial code. Tell him “Mo” sent you.
Enjoy!
Hi Mohammad,
What are the minimum system requirements for Big Data cluster?
“You have at least 3 virtual machines running with the minimum hardware requirements”
Should 4 GB of RAM and 2 cores processor (for each of the virtual machines hosted on the virtual box) be enough? I have a laptop with 16 GB of RAM and I am unable to deploy the big data cluster. I wonder if I am doing something wrong or if my laptop is too week.
If we want to migrate our SQL server instance to Kubernetes is it better to deploy it in big data cluster or in new Kubernetes cluster?
For example I have some ETL tools (like apache Nifi) and get data from some APIs and store it in SQL server. Is it better to have the tools (in this example Nifi) and SQL server in a big data cluster or in a separate Kubernetes cluster?
Thanks for the explanation. Metricsdc pod doesn’t run healthy I don’t know what is the problem.
Here are the logs:
2021/09/04 12:13:41 Starting “Kubernetes DNS resolution” with retries
2021/09/04 12:13:41 “Kubernetes DNS resolution” succeeded
2021/09/04 12:13:41 Changed the container umask from ‘—–w–w-‘ to ‘——–w-‘
2021/09/04 12:13:41 Creating directories with the ‘21000:21000’ owner and ‘-rwxrwxr-x’ mode: [/var/opt /var/log /var/run/config /var/run/configmaps /var/run/etc /var/run/secrets /var/run/secrets/credentials /var/run/secrets/certificates /var/run/secrets/keytabs /var/run/secrets/keystores /var/run/secrets/truststores /var/run/secrets/managed /var/run/secrets/managed/credentials /var/run/secrets/managed/certificates /var/run/secrets/managed/keytabs /var/run/secrets/managed/keystores /var/run/secrets/managed/truststores]
2021/09/04 12:13:41 Creating directories with the ‘21000:21000’ owner and ‘-rwxrwx—‘ mode: [/var/log/agent /var/opt/agent /var/run/agent]
2021/09/04 12:13:41 Creating directories with the ‘21001:21001’ owner and ‘-rwxrwx—‘ mode: [/var/opt/supervisor /var/log/supervisor /var/run/supervisor /var/log/supervisor/log]
2021/09/04 12:13:41 Searching agent configuration file at /opt/agent/conf/metricsdc.json
2021/09/04 12:13:41 Searching agent configuration file at /opt/agent/conf/agent.json
2021/09/04 12:13:41.167263 Agent configuration: {“PodType”:”metricsdc”,”ContainerName”:”telegraf”,”GRPCPort”:8300,”HTTPSPort”:8400,”ScaledSetKind”:”DaemonSet”,”securityPolicy”:”certificate”,”dnsServicesToWaitFor”:null,”cronJobs”:null,”serviceJobs”:null,”healthModules”:null,”logRotation”:{“agentLogMaxSize”:500,”agentLogRotateCount”:3,”serviceLogRotateCount”:10},”fileMap”:{“krb5.conf”:”/var/run/etc/krb5.conf”,”metricsdb-wo-user-password”:”/var/run/secrets/credentials/metricsdb-wo-secret/password”,”metricsdb-wo-user-username”:”/var/run/secrets/credentials/metricsdb-wo-secret/username”,”resolv.conf”:”/etc/resolv.conf”,”telegraf-certificate.pem”:”/var/run/secrets/certificates/telegraf/telegraf-certificate.pem”,”telegraf-privatekey.pem”:”/var/run/secrets/certificates/telegraf/telegraf-privatekey.pem”,”telegraf.conf.tmpl”:”/var/run/telegraf/conf/telegraf.conf”},”userPermissions”:{“telegraf”:{“user”:”telegraf”,”group”:””,”mode”:””,”modeSetgid”:false,”forSecretCopy”:false,”allowPermissionFailure”:false,”directories”:[]},”telegraf-k8s-secrets”:{“user”:”telegraf”,”group”:””,”mode”:””,”modeSetgid”:false,”forSecretCopy”:true,”allowPermissionFailure”:false,”directories”:[“/var/run/secrets/credentials/metricsdb-wo-secret”]}},”fileIgnoreList”:[“agent-certificate.pem”,”agent-privatekey.pem”],”InstanceID”:”UeqG5KHziD4Dlt0lo3tOEkMpGMYsR4HV”,”ContainerID”:””,”StartServicesImmediately”:false,”DisableFileDownloads”:false,”DisableHealthChecks”:false,”serviceFencingEnabled”:false,”IsConfigurationEnabled”:false,”IsArc”:false,”enableGRPCProxy”:false,”LWriter”:{“filename”:”/var/log/agent/agent.log”,”maxsize”:500,”maxage”:0,”maxbackups”:10,”localtime”:true,”compress”:false}}
2021/09/04 12:13:41.317670 Agent joining cluster immediately
2021/09/04 12:13:41.317695 Attempting to join cluster…
2021/09/04 12:13:41.317787 [Reaper] Starting the signal loop for reaper
2021/09/04 12:13:41.758124 Starting gRPC listener on 0.0.0.0:8300
2021/09/04 12:13:41.833992 Cluster join successful.
2021/09/04 12:13:41.834072 Stopping gRPC server on
2021/09/04 12:13:41.834205 gRPC server ended: http: Server closed
2021/09/04 12:13:43.341121 Configuration version received: 0
2021/09/04 12:13:43.341281 Creating directories with the ‘21102:21102’ owner and ‘-rwxrwx—‘ mode: [/var/opt/telegraf /var/log/telegraf /var/run/telegraf /var/run/config/telegraf /var/run/secrets/managed/credentials/telegraf /var/run/secrets/managed/certificates/telegraf /var/run/secrets/managed/keytabs/telegraf /var/run/secrets/managed/keystores/telegraf /var/run/secrets/managed/truststores/telegraf /var/run/secrets/credentials/telegraf /var/run/secrets/certificates/telegraf /var/run/secrets/keytabs/telegraf /var/run/secrets/keystores/telegraf /var/run/secrets/truststores/telegraf]
2021/09/04 12:13:43.341495 Creating directories with the ‘21102:21102’ owner and ‘-rwxrwx—‘ mode: [/var/run/secrets/credentials/metricsdb-wo-secret]
2021/09/04 12:13:43.341586 Skip the copy of existing secret file “/var/run/secrets/credentials/metricsdb-wo-secret/username”
2021/09/04 12:13:43.341598 Skip the copy of existing secret file “/var/run/secrets/credentials/metricsdb-wo-secret/password”
2021/09/04 12:13:43.341604 Downloading files
2021/09/04 12:13:43.341609 Getting manifest from controller…
2021/09/04 12:13:43.350967 Getting manifest from controller for version 0…
2021/09/04 12:13:43.357302 Downloading ‘/config/scaledsets/metricsdc/containers/telegraf/files/telegraf.conf.tmpl’ from controller…
2021/09/04 12:13:43.357330 Downloading ‘/config/scaledsets/metricsdc/containers/telegraf/files/telegraf-certificate.pem’ from controller…
2021/09/04 12:13:43.357373 Downloading ‘/config/scaledsets/metricsdc/containers/telegraf/files/telegraf-privatekey.pem’ from controller…
2021/09/04 12:13:43.364687 Stored 1691 bytes to /var/run/secrets/certificates/telegraf/telegraf-privatekey.pem
2021/09/04 12:13:43.365795 Stored 1241 bytes to /var/run/secrets/certificates/telegraf/telegraf-certificate.pem
2021/09/04 12:13:43.366142 Stored 9609 bytes to /var/run/telegraf/conf/telegraf.conf
2021/09/04 12:13:43.366245 Agent is ready.
2021/09/04 12:13:43.366465 Starting supervisord with command: ‘[supervisord –nodaemon -c /etc/supervisord.conf]’
2021/09/04 12:13:43.366948 Started supervisord with pid=697
2021/09/04 12:13:43.366961 Starting agent services
2021/09/04 12:13:43.367029 Starting HTTPS listener on 0.0.0.0:8400
2021/09/04 12:13:43.367202 Starting gRPC listener on 0.0.0.0:8300
2021/09/04 12:13:44.371421 [READINESS] Not all supervisord processes are ready. Attempts: 1, Max attempts: 250
2021/09/04 12:13:44.371442 [READINESS] – Found unready service(s): – Name=’telegraf’ State=’STARTING’
2021/09/04 12:13:44.371758 Loading go plugin plugins/bdc.so
2021/09/04 12:13:44.371770 Loading go plugin plugins/dusky.so
2021/09/04 12:13:44.371774 Loading go plugin plugins/platform.so
2021/09/04 12:13:44.371792 Starting the health monitoring, number of modules: 3, services: [“telegraf”,”agent”]
2021/09/04 12:13:44.371795 Starting the health service
2021/09/04 12:13:44.371799 Starting the health durable store
2021/09/04 12:13:44.371802 Loading existing health properties from /var/opt/agent/health/health-properties-main.gob
2021/09/04 12:13:44.371927 &[]
2021/09/04 12:13:44.380277 Adding a new plugin plugins/bdc.so
2021/09/04 12:13:44.390159 Adding a new plugin plugins/dusky.so
2021/09/04 12:13:44.402566 Adding a new plugin plugins/platform.so
2021/09/04 12:13:44.402613 Created a health module watcher for service ‘telegraf’
2021/09/04 12:13:44.402621 Starting a new watcher for health module: telegraf
2021/09/04 12:13:44.402636 Starting a new watcher for health module: agent
2021/09/04 12:13:44.402650 Health monitoring started
2021/09/04 12:13:55.373345 [READINESS] Not all supervisord processes are ready. Attempts: 2, Max attempts: 250
2021/09/04 12:13:55.373380 [READINESS] – Found unready service(s): – Name=’telegraf’ State=’FATAL’
2021/09/04 12:14:04.368535 [MONITOR] Service states: map[telegraf:FATAL]
2021/09/04 12:14:06.375001 [READINESS] Not all supervisord processes are ready. Attempts: 3, Max attempts: 250
2021/09/04 12:14:06.375031 [READINESS] – Found unready service(s): – Name=’telegraf’ State=’FATAL’
2021/09/04 12:14:17.376596 [READINESS] Not all supervisord processes are ready. Attempts: 4, Max attempts: 250
2021/09/04 12:14:17.376626 [READINESS] – Found unready service(s): – Name=’telegraf’ State=’FATAL’
2021/09/04 12:14:28.378185 [READINESS] Not all supervisord processes are ready. Attempts: 5, Max attempts: 250
2021/09/04 12:14:28.378211 [READINESS] – Found unready service(s): – Name=’telegraf’ State=’FATAL’
It would be best if you email me with your question, thanks!
Hi,
I am hitting the same error. 3 “metricsdc-8pvvr” pods are repeatedly crashing.Please guide.
Thanks and Regards
Sreeraj
Hello Mohammad,
we have setup 4 node cluster on Red Hat/VMware. Things looks okay, except when we restart primary replica SQL Server. Have you tried restarting primary SQL Server replica?
We are trying to see if this is specific to Red Hat/VMWare environment.
Thank you.
Hello Ung,
I have a few questions about your setup before I can help. Please email me (contact form), and I’ll reply back with my questions, thanks!
Thanks for detail explanation, I’ve managed to install multi-node BDC cluster but i can’t make the MSDTC to work. I’ve followed the MS-doc https://docs.microsoft.com/en-us/sql/linux/sql-server-linux-configure-msdtc-docker?view=sql-server-ver15 , but its not for Kubernetes.
Is there workaround for it?
Hi Mohammad, I am new to this Kubernetes world, but have started to get fair idea about how this works. Was following your blog to setup a cluster, but i get into multiple troubles. Firstly helm installation fails. After some time and retry it may work on couple of nodes. Later, while setting up the Master node, POD network creation throws me out. My Servers have two networks, and are configured well.
Well I changes my testing setup from a PC with Virtual BOX to ESX hypervisor. And Here i was able to setup my first Kubernetes cluster. :)
Now looking forward to have SQL on top of it.
Yay! Glad you got it going!
getting error : libreadline.so.6: cannot open shared object file: No such file or directory when attempting the azdata bdc create after I accept the license terms
Hey Mike, feel free to shoot me an email (contact page) with your current setup, etc. and I’ll try my best to help you out!
Will you be doing a video for this post as well? It would be very helpful.
Hey Tom, yeah it’s currently in the works. :)