Before you deploy big data clusters, you must configure the tools below on a Windows or Linux machine that will act like a “base machine” from which you will be able to deploy, manage, and monitor a SQL Server Big Data Cluster. For the example in this blog I will use a virtual machine running Windows Server 2016 running 4 cores and 8 GB RAM. (This can also work on a Windows 10 Pro machine as well).
Required Tools
The tools that are required are below. Azure CLI is actually optional and only required if you plan on deploying your BDC on AKS (Azure Kubernetes Service). Since I will be deploying on AKS I have included it below as a requirement.
- Python – This is a programming language and many components of BDCs use python.
- Kubectl – This is the command line tool used for monitoring the Kubernetes cluster
- azdata – This is a command line tool used primarily for installing and managing a Big Data Cluster.
- Azure-CLI – This is used for managing Azure services, primarily will be used with AKS BDC deployments.
- Azure Data Studio (RC) – Think of SSMS but a little different (we’ll talk more about this in the demo video).
- SQL Server 2019 extension – ADS extension used for connecting to a BDC.
Setting It All Up
Download and install the latest version of Azure Data Studio.
Download the SQL Server 2019 extension for ADS and install that by first starting ADS, then going to File, then click on Install Extension from VSIX Package and navigate to where you downloaded the extension and install it. You can also install the PowerShell extension as well and use the integrated PowerShell prompt inside Azure Data Studio. I do it that way in my video. If you want the PowerShell script I used in the video, download it here. (Just remember to rename the from from .txt to .ps1.)
Open PowerShell (as admin) and install the Windows Package Manager called, Chocolatey. Run the following in the PowerShell window:
Set-ExecutionPolicy Bypass -Scope Process -Force; iex ((New-Object System.Net.WebClient).DownloadString('https://chocolatey.org/install.ps1'))

choco feature enable -n allowGlobalConfirmation
After Chocolatey is installed it’s time to install Azure CLI and Kubectl by running the below commands:
choco install azure-cli

choco install kubernetes-cli
Problems with Python
Once the above utilities are installed, it’s time to install Python. I want to preface with this…I am not a developer. I am a SQL DBA diving into the wonderful world of Big Data Clusters. I did encounter a couple issues while installing Python that I will do my best to explain (you might want to watch my video for further explanation). So here goes…
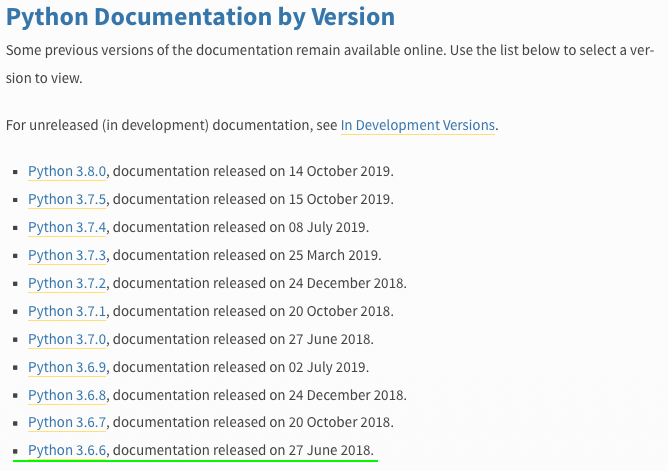
First of all, the Python version that Azure Data Studio installs by default (as of this writing) is version 3.6.6. According to Python’s website, (see screenshot below) that was published back in June 27, 2018:
When I install Python via ADS, I encounter a couple error messages saying that I have a bunch of packages that are “not up to date” Go figure.
So I tried to install Python without ADS by using the Python installer for Windows which at the time of this writing is version 3.8. Then when I go back to ADS to install the dependencies (which you will see how to do below) it gives different type of errors.
So what did I do? I finally figured out that the most up-to-date version I can install while *still* allowing ADS to install its dependancies without errors was version 3.7.5.
How did I do that? “Simple”
I used wonderful Chocolatey to execute the following command:
choco install python --version=3.7.5
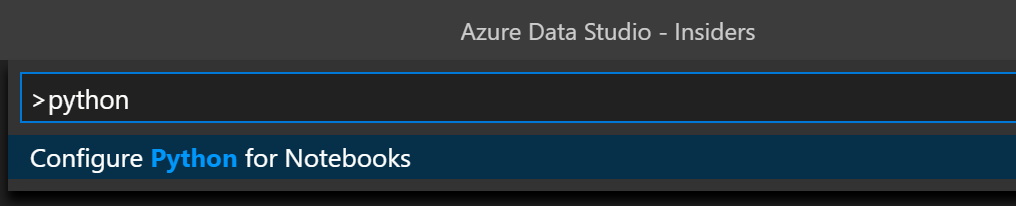
After executing the above command, go ahead and open up ADS and click on the settings wheel on the lower left corner. Next, click on Command Palette and type “python” in the search bar. There should be only one results called, “Configure Python for Notebooks” like the screenshot below:
That will bring up the below screen:
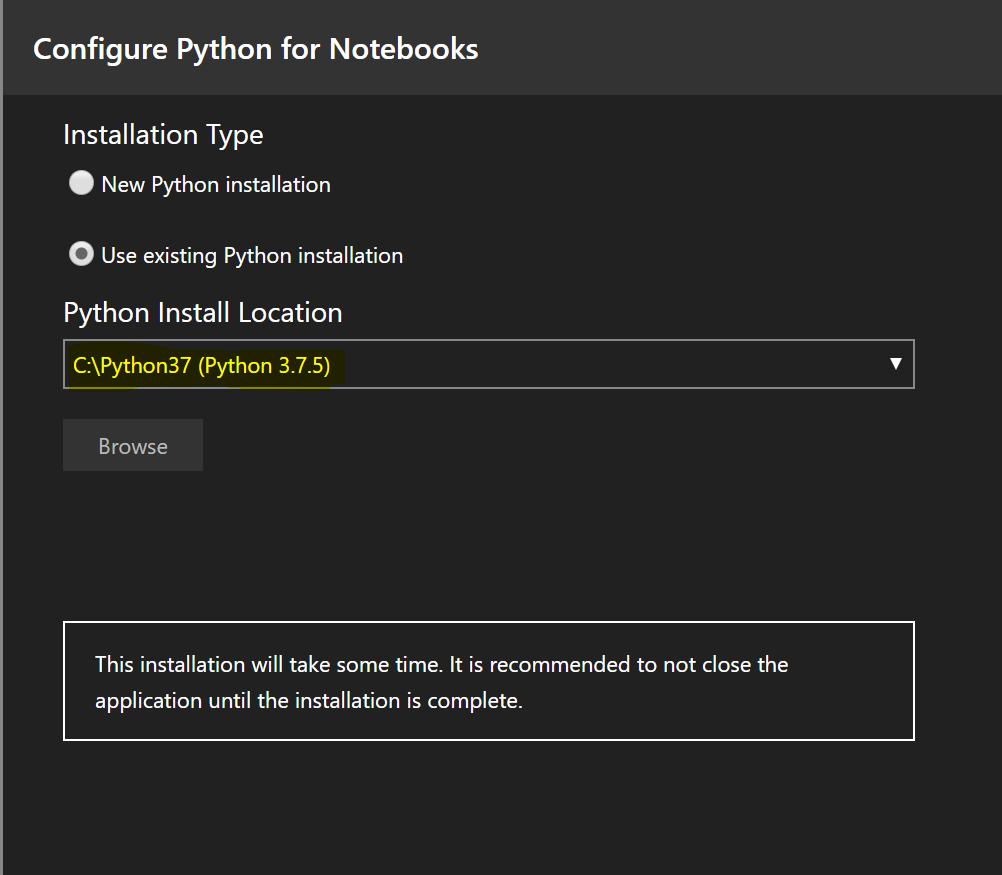
Choose the “Choose existing Python installation” and click Install at the bottom. This will install the dependacies in addition to your Python 3.7.5 installation from earlier.
Once the installation is complete you will need to install the last utility, azdata by executing the following command in PowerShell:
pip3 install -r https://aka.ms/azdata
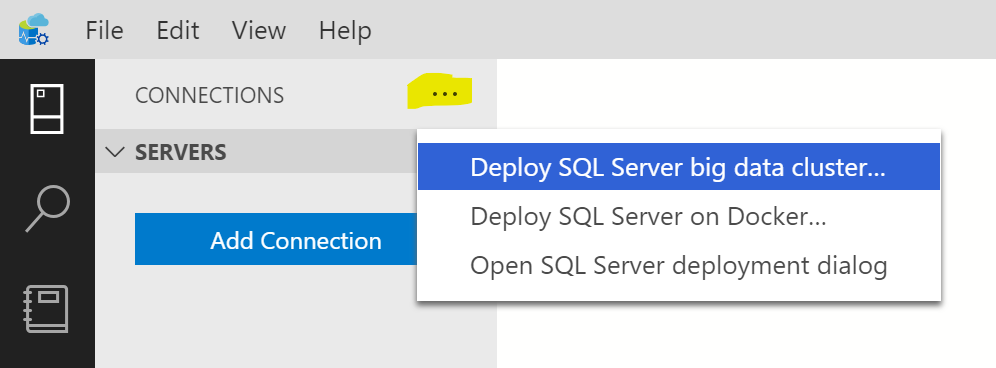
Now it’s time to make sure everything works properly! Open up ADS (if it isn’t already) and click on the Connections pane, then the “…” (more actions) and choose “Deploy SQL Server big data cluster” option as show in screenshot below:
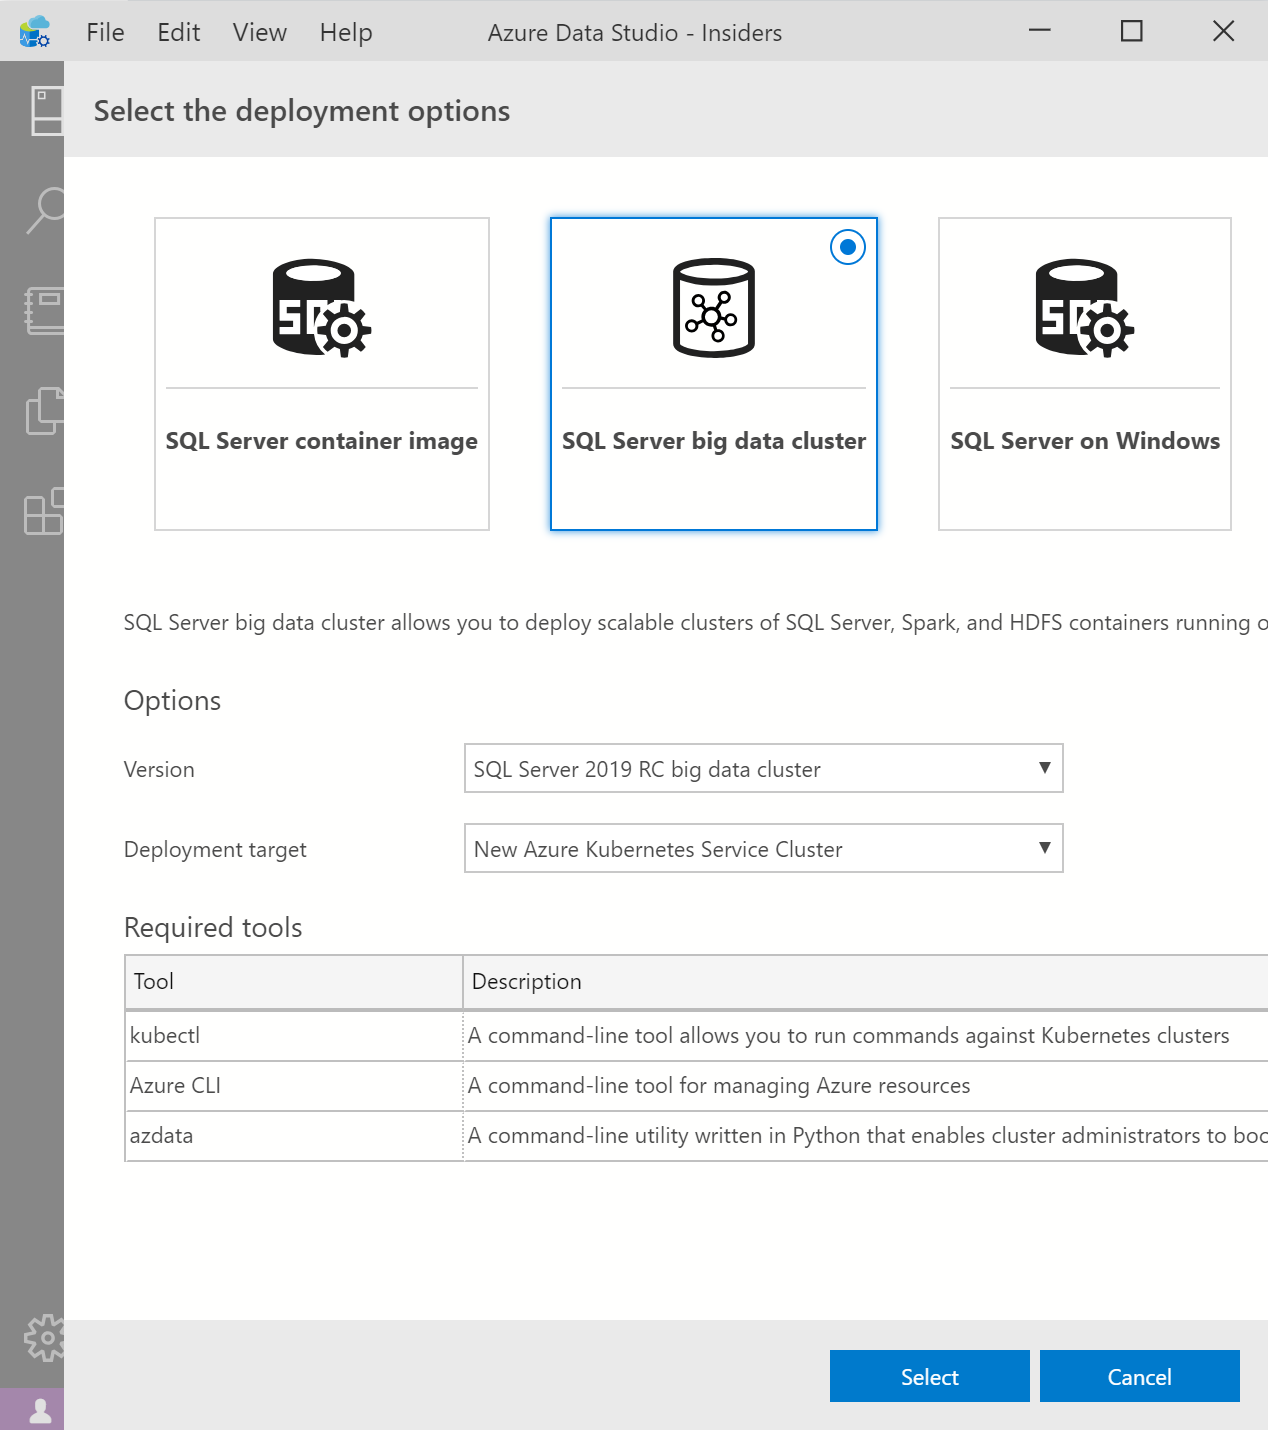
This will bring up the “Select the deployment options” window. Leave everything default and click Select as shown below:
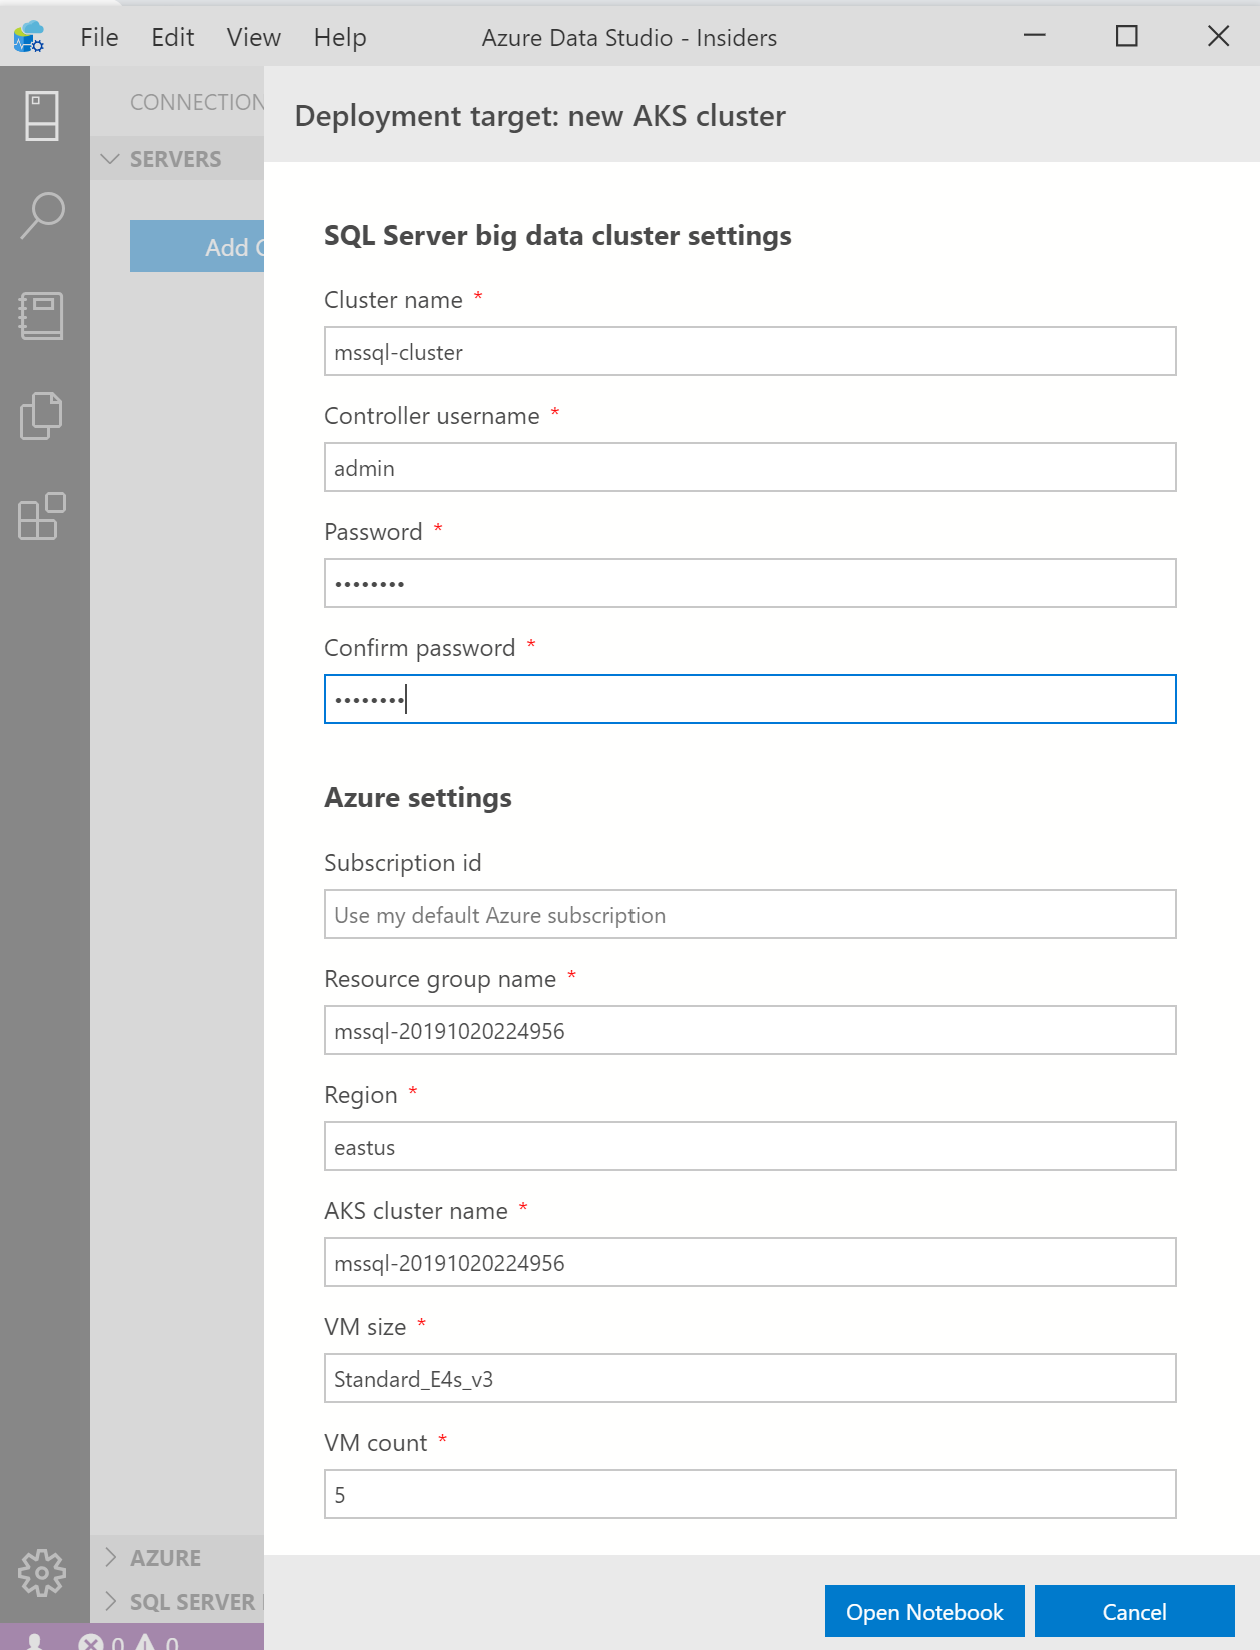
In the next screen, type in a password (don’t worry, we are just testing…) and click Open Notebook as show in image below:
Once you click “Open Notebook” you will see the built-in notebook called “deploy-bdc-aks” as shown in image below:
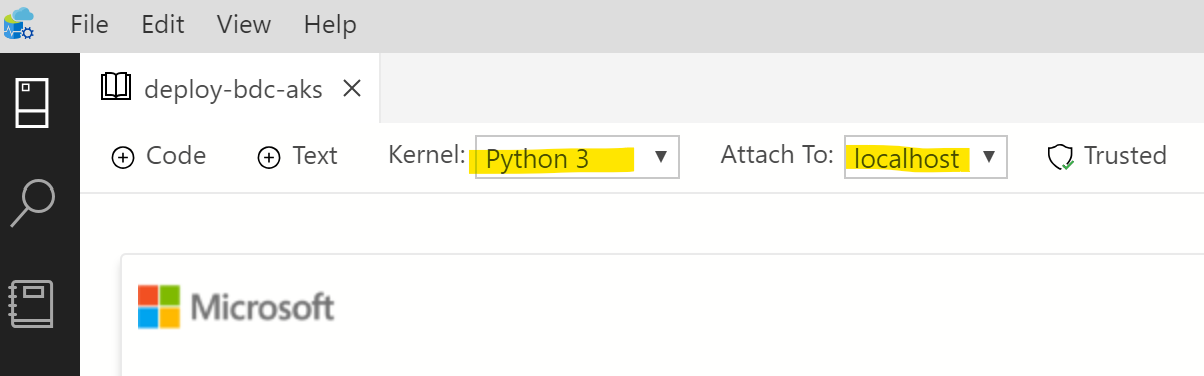
If you see Python 3 for the Kernel and localhost for Attach To then you’re good to go! You’re read to deploy a Big Data Cluster on AKS!
If you do NOT see the above, or see “loading” in both drop downs then there is something you missed along the way. Please leave a comment or feel free to reach out to me so that I can help you troubleshoot.
Optional Tools
In addition to the required tools above, I will include the following optional tools:
- mssql-cli – Modern command line tools for querying SQL Server
- sqlcmd – Legacy command line tool for querying SQL Server
- curl – Used for traferring data with URLs
To install mssql-cli, execute the following PowerShell command:
pip3 install mssql-cli
To install sqlcmd, download and install it here.
To install curl, download and install it here.
In my next post (and video), I will go through this notebook and actually deploy a big data cluster so stay tuned for that!
Hi Mohamad,
Can we install BDC on windows machine?
No, it can only be installed on Linux for now.
but from this link there’s an option for windows, does it mean all can be install Windows platform?
https://docs.microsoft.com/en-us/sql/big-data-cluster/deploy-big-data-tools?view=sql-server-ver15
Hello Jay,
The option for windows that you see at that link only refers to the tools/utilities used to *deploy* a BDC. Not the *actual* BDC.
ok, understood, thanks for the fast reply
Thanks Mohammad to make very complex topic to easily understandable !!
You’re welcome Neeraj!